

Installation Guide of Pressure Reducing Valve
Hello readers, today I brought you the installation process of the pressure reducing valve. The purpose of Pressure Reducing Valves, or more so Water Pressure Reducing Valves, is to reduce the pressure of scrambling water/steam/liquid to a moderate and definite level ordinarily at a consistent level in order to make it safer. Through a pressure change in the valve setting, the downstream pressure is guaranteed in residential, institutional, commercial, and mechanical establishments. Advanced models do not function without an outer sensor as well. Furthermore, the Pressure Independent Control Valve (PICV) consists of a Diaphragm type DPCV to guarantee a steady differential pressure over the opening with the end goal of maintaining a steady flow rate.
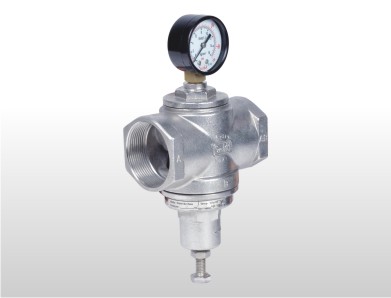
Pressure reducing valves can be either direct acting or pilot operated. They are either globe or angle-shaped. The direct-acting valve has gained more popularity in comparison to globe-type bodies with a spring-loaded diaphragm, a spring, and a warm-safe diaphragm connected to the outlet valve. To increase the accuracy of water pressure control, the spring presets strain on the valve seat, which is a pressure-balancing mechanism.
Aira Euro Automation is one of the world’s leading valve manufacturers and suppliers. Various types of industrial valves are available as well as customised products to meet the needs of various industries at one location. Quality control departments test product samples before delivery.

Pressure Reducing Valve Installation Steps
- The first step is to determine the pressure of the inlet water. You can do this by attaching a pressure gauge to the hose sill.
- Install the pressure reducing valve if the pressure is exceedingly high.
- Attaching a pressure gauge at both ends with the help of threaded pipe and fittings is the first step towards creating the pressure reducing valve.
- The pressure reducing valve assembly should be positioned before the water pipe to mark where it should be cut.
- Once the main water supply has been shut off, drain any remaining water from the pipes.
- With a tubing cutter, cut the water pipe section on the mark made in step 4.
- It is necessary to remove the pressure gauges and rubber O-rings from the valve assembly.
- A brush of flux should be applied to the ends of the valve assembly.
- Assemble the valve assembly and weld it to the water pipeline.
- The pressure gauges and O-rings should be reinstalled after the assembly has cooled.
- Install a pressure gauge on the outlet side of the valve and turn on the main water supply.
- Using the anti-clockwise adjustment screw, lower the water pressure if it is too high.
- A screw should be turned counterclockwise at the inlet side when the pressure is very low.
Applications of pressure reducing valves
- For the protection of electric hot water storage heaters and household appliances, pressure reducing valves are used.
- Buildings and the distribution system of domestic water
- As a collective installation
- Installations in industrial settings
The pressure reducing valve has a wide range of applications and demand. For various industrial purposes valve manufacturers like aira euro automation ltd are always prepared to make according to the user’s requirements.